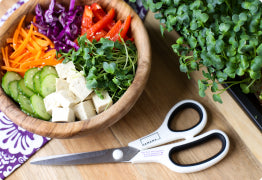
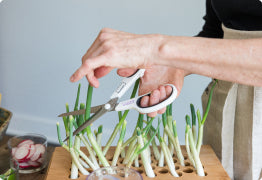
Romaine microgreens Romaine microgreens have a hearty flavor and refreshing texture, reminiscent of mature Romaine lettuce. They are crisp, juicy, slightly sweet & slightly bitter, making them a delicious addition to a variety of dishes including sandwiches, wraps & salads. They make a great garnish for any savory dish. Tasty & healthy - These tender little greens are definitely worth a try! Health Benefits 🌱 Good source of vitamins A, B9, C & K 🌱 Good source of minerals such as calcium, folic acid, potassium & thiamin 🌱 High in fiber 🌱 May help prevent inflammation 🌱 Excellent for eye and heart health Flavor Profile 🌱 Mildly sweet and bitter, like mature romaine lettuce 🌱 Refreshing, juicy, crisp & crunchy texture Appearance 🌱 White and green stems with light green leaves 🌱 Soft & tender How to use them: 🌱 Toss into salads & sandwiches 🌱 Pile onto BLTs, chicken salad sandwiches or a chicken Caesar wrap 🌱 Garnish any savory dish for a pop of flavor and refreshing crunch We’ve compiled some of our favorite romaine microgreen recipes. You can find them here! Follow our Micro-Romaine Growing Experience The peel time is around 4-5 days after the initial soak. The grow time is around 7-10 days. Romaine microgreens will grow to be about 2-3 inches tall when ready to harvest. Day 1 Planting the Seed Quilt: Just follow the simple Hamama instructions. Give your Seed Quilt a quick shake to evenly distribute the seeds, add water to just below the fill line on your tray, then set the quilt on the tray’s bottom ribs. To ensure that it is adequately soaked, be sure to hold it down long enough for the quilt to turn a shade darker. After the soak, be sure that the quilt is properly propped on the tray's bottom ribs so that neither side of the quilt is dipping into the water. Make sure that no water is left pooling on top of the seed pockets. Find more watering tips here. Day 2 The Seed Quilt won’t look much different. The water level may have gone down from day one, which is normal [Do not add additional water at this point]. Another thing to note is the environment where you keep your greens! When referring to temperature, anywhere between 65-80 F is best. The warmer they are in that range, the faster they will grow with predictable health. Cooler temps can stunt the growth and it'll take a little longer for the seeds to germinate. What’s the top layer for? It's important to have a weighted black-out period for the first few days of growing microgreens. The weighted black-out period (seeds held down + darkness) encourages the seeds to send their roots downward, as opposed to growing outward and sending out root hairs to grab moisture from the air. Days 3 - 4 You should see some germination by day 3 or so. You should notice even ballooning across the Seed Quilt more and more each day after that. At this point, they are starting to set their roots down into the coconut mat. White Fuzzy Roots, What’s the Deal? If you see white fuzzy root hairs, know that your Seed Quilt is happy, healthy and growing! Don’t worry - these tiny little root hairs are a completely normal part of the growing process. When roots have access to lots of oxygen for root respiration, these tiny fuzzy root hairs form - a great sign of healthy, happy root development! Days 5 - 6 Peel Day! Once the greens are pushing through the top layer across the whole Seed Quilt, causing it to either rip or balloon up, it’s ready to peel. If the paper is ballooned, you can peel it off in one motion. If the paper is ripped, just remove the paper pieces individually. Try not to peel too early! As the roots begin to grow, they need that top layer to encourage them to penetrate the bottom of the mat. Without it, the roots risk staying above the mat, which would cause them to dry out. Not only does it help the roots but it is also super beneficial for the greens themselves! It keeps moisture in from the initial soak, regulates temperature and humidity, and also shields the seeds from light during the germination process. Day 7 - 10 Your micro-Romaine will continue to grow each day from here on out. You’ll notice a big change in your greens from just morning to night, especially right after peeling and exposing them to light. They will turn greener as they absorb more light. As the greens get bigger they also tend to take up a lot more water. This is the perfect time to check the water level in your tray, especially if you live in a drier climate. If you notice that the water level has gone below the halfway point of the fill line and bottom of your tray, you can add enough water to reach the ridges at the base of the tray. This gives those roots enough water to sustain the greens without over-watering them. Never fill the water back up to the fill line. For a general rule of thumb, Romaine microgreens will range from 2-3 inches tall at maturity. This is just a reference as growing conditions (light, temp, etc) will affect the mature height slightly. You’ll want to harvest at this point as romaine microgreens tend to get more fibrous and take on a different flavor if left to grow too tall. Harvesting & Storing your Microgreens Fresh romaine microgreens can be harvested by cutting at the base & storing them in a glass Tupperware or Stasher Bag in the fridge. They will last for about 10 days that way. The greens can also become slightly bitter and more fibrous the longer you leave them in the tray after maturing. * Make harvesting & storing your homegrown greens a breeze. The Hamama Harvesting Kit includes a reusable Stasher Bag®, cute branded harvesting scissors, and natural fiber bamboo scrub brush for cleaning your grow tray. Do you need to rinse microgreens before use? When the microgreens are ready to harvest you don't need to rinse them, but you can if you prefer. Since there’s no soil, they’re already super clean. *For longer storage, don’t rinse the harvested microgreens before storing. Instead, rinse just before eating, if desired. What's next? After harvesting your greens, you can compost or re-purpose the used coconut mat. Learn how to Upcycle your Coconut Mats here. Give your grow tray a quick wash & plant your next Seed Quilt. Learn how to wash your grow tray here. Reach our team of Grow Coaches at hamama.com/help. We hope you enjoy our Romaine microgreens! 💚🌱 References Kim,M.J.et al. Nutritional value, bioactive compounds and health benefits of lettuce (Lactuca sativa L.) J Food Comp Anal 2016 Vol 49: 19-34; doi.org/10.1016/j.jfca.2016.03.004. Yang,X.et al. Bioactive compounds in lettuce: highlighting the benefits to human health and impacts of preharvest and postharvest practices. Compr Rev Food Sci Food Saf. 202221: 4–45; doi.org/10.1111/1541-4337.12877. Im, S.E. et al. Anti Neurodegenerative effect of phenolic extracts and caffeic acid derivatives in romaine lettuce on neuron-like PC-12 cells. J Med Food 2010 13:779-84. doi:10.1089/jmf.2009.1204