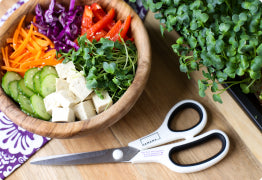
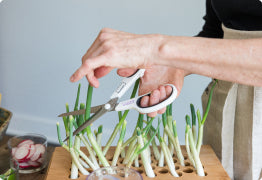
Our Energizing Kale Microgreens are a must try!! Seed Quilts are made with organic seeds too! Their flavor is similar to adult kale (or spinach), but they are slightly milder & sweeter with a subtle nutty aftertaste. Our Energizing Kale Microgreens are perfect for adding to a salad, sandwich, smoothie, or for garnishing nearly any dish. You can even make micro kale chips!! Your Kale microgreens will be ready to peel in about 5-6 days from their initial soak and are typically ready to harvest in about 10 days! Your Kale greens will be about 1.5-2 inches tall (usually shorter than the broccoli microgreens) when they reach maturity. Our kale micros have beautiful bold & bright green leaves. Day 1 - Kale yeah! For setup, just follow the regular simple Hamama instructions like you always do! Here is an electronic version of our instructions if you need a quick refresher :D The initial soak is always the most important step in the process as it provides the seeds in your quilt with the water to jump-start the germination process. To ensure that it is adequately soaked, be sure to hold it down long enough for the quilt to turn a shade darker. A good trick is to flick the Seed Quilt! If the seeds roll around in their pods, that is a good sign it is too dry and could soak for just a little longer. After the soak, you want to be sure that the quilt is properly propped on the tray's bottom ribs so that neither side of the quilt is dipping into the water. You also want to be sure the seed pockets are not underwater after the dunk! Here are some extra watering tips! If you have been contemplating growing more seed quilts simultaneously, check out our website for single or double packs of grow trays! Day 2- Still Cookin’! You won’t see much happening on day two but I do want to share some important things to note: -The water level may have gone down significantly from day one. That’s totally normal! Our Seed Quilts and trays are designed to provide the seeds with enough water to last them from day one until harvest day. No need to add additional water at this point! -Another thing to note is the environment where you keep your greens! When referring to temperature, anywhere between 60-80 F is best. The warmer they are in that range, the faster they will grow on time with predictable health. Cooler temps can stunt the growth and it'll take a little longer for the seeds to germinate. Microgreens don't necessarily need a lot of light to grow but will halt if they are too cold so I would prioritize warmth over light! Remember our rule of thumb: if it’s comfy for you, it’ll be comfortable for your little plant babies! Curious what that top layer is for? It's important to have a weighted black-out period for the first few days of growing microgreens. The weighted black-out period (seeds held down + darkness) encourages the seeds to send their roots downward, as opposed to growing outward and sending out root hairs to grab moisture from the air. Day 3 - Keep Kale-ing It! Kale pictured on right You should start to see your seed quilt ballooning up at this point! This means your seeds are starting to germinate and produce small roots! Day 4 - Ballooning in sight! You can see that the entire quilt is starting to puff up by now! This is a great sign that your kale is right on track to be peeled! We want to make sure we don’t open these before they have finished “cooking” so we are going to give it another day or two to balloon entirely before peeling the top layer off. It is super important not to peel too early! As the roots begin to grow, they need that top layer to encourage them to penetrate the bottom of the mat. Without it, the roots risk staying above the mat, which would cause them to dry out and die. Not only does it help the roots but it is also super beneficial for the greens themselves! It keeps moisture in from the initial soak, regulates temperature and humidity, and also shields the seeds from light during the germination process! Day 5- Peel & Grand Reveal There are two ways in which your quilt can peel as demonstrated in the image below. This particular Kale Seed Quilt is a great example of a “ballooned” quilt which allows you to just peel the cover off in one motion! Depending on growing conditions, some quilts will rip through the top layer rather than balloon. All you have to do in that case is remove the pieces individually. In the above example, the Cabbage (center) ripped through the paper and the Kale (right) ballooned. If you are curious to see what the ripping looks like in more detail, check out our refreshing cabbage growing diary! The Grand Reveal!! :D Day 6- Micro Buddies Now that your greens aren’t hiding under that top layer, you can see just how much they grow day to day! They will also turn greener as they absorb more light. As the greens get bigger they also tend to take up a lot more water. That makes this the perfect time to check the water level of your greens, especially if you live in a drier climate! If you notice that the water level has gone below the halfway point of the fill line and bottom of your tray, you can add enough water to reach the ridges at the base of the tray. This gives those roots enough water to sustain the greens without over-watering them! *Remember, this only applies to dry or really hot growing conditions - the normal function is that you just add water once! :) Pictured from left to right: Wasabi Mustard, Kale, Cabbage, & Radish Day 7- Hanging with the big greens! For a general rule of thumb, your Kale microgreens will range from 1.5-2 inches tall at maturity. Just like any other thing though, this is just a reference as growing conditions (light, temp, etc) will affect the mature height slightly. The Kale microgeens are shorter that some varieties but they are super lush and dense. So pretty & fun to pet (with clean hands of course)! Day 8- Harvest in the Horizon By now I am munching on these every time I walk by them! Remember to check the water level again to get a sense of growing in your particular environment! You don’t want your tray to become bone-dry. Mine have a bit of a lean to them because they were stretching for sunlight! I try to remember to rotate my tray once in a while to balance this out. Day 9- Almost There.. Your kale greens are about ready to be harvested! Crazy what a difference 24 hours can make! Look how lush! Day 10- We Totally Kaled it!! Harvest day is finally upon us and the greens are looking ready to be put in or on some yummy food! Did you know you can grow different varieties of seeds at one time!? If you would like to try it out, you would carefully cut the Seed Quilt in halves and just grow those out together in one tray. Just be sure to plant them at the same time because water levels vary throughout the growth cycle! This Kale/Cabbage combo is beggin' to be used as an incredibly beautiful garnish or in a nutrient-packed smoothie! Storing your Energizing Kale Microgreens Your Kale greens can be harvested by cutting at the base & storing them in a glass Tupperware or Stasher Bag in the fridge. They will last for about 10 days that way! If you prefer to munch on your greens while they are in the tray, the mature greens can remain there for a few extra days, but you must periodically check that they have enough water to drink! Otherwise, they may prematurely wilt over from thirst. The greens can also become slightly bitter and more fibrous the longer you leave them in the tray after maturing. Hamama Friend, Tuesdee Monaghan's beautiful Kale harvest! Make harvesting & storing your homegrown greens a breeze! The Hamama Harvesting Kit includes a reusable Stasher Bag®, cute branded harvesting scissors, and natural fiber bamboo scrub brush for cleaning your grow tray! Do you need to rinse your microgreens before use? When the microgreens are ready to harvest you don't need to rinse them, but you can if you want. Whatever you feel comfortable with! Since there’s no soil, they’re already super clean. Most folks rinse if they have pets who may have been snooping around in them :D *For longer storage, don’t rinse the harvested microgreens before storing. Instead, rinse just before eating, if desired! What's next?After harvesting your greens, you can compost or re-purpose the used coconut mat! Learn how to Upcycle your Coconut Mats here! Then, you can give your grow tray a quick wash & plant your next Seed Quilt! Learn how to wash your grow tray here. How to Eat your Kale Microgreens: My personal favorite uses for the Kale microgreens are for adding a nice, healthy garnish to just about any meal. They are also great in smoothies! Check out some of standout recipes below: Check out how Hamama Growers are using our Energizing Kale Microgreens Hope you love our Kale Microgreens! Allie, Barbara & the rest of your Hamama Team