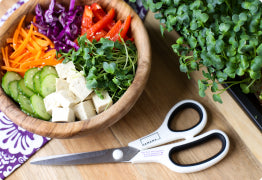
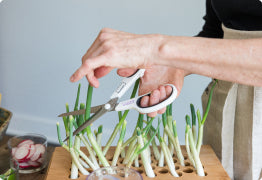
Did you know? Our Super Salad Seed Quilt is a lovely mix of sweet, savory and mild greens. It includes broccoli, kale, kohlrabi, cauliflower, and cabbage! This mix of microgreens provides a harmonious combination of colors & flavors when used as a garnish on sandwiches, wraps, eggs, pizza, and just about any savory meal! These Super Salad Mix microgreens will be ready for peeling about 5-6 days after planting and will be ready for harvest in about 10 days! Sometimes we get asked if our Seed Quilts can be cut into sections so that a variety of greens can be grown out at the same time. This is great for a bit of variety if growing with 1 tray (we do offer extra trays for those who want to grow out several quilts simultaneously 😁). While you may experiment with this method of course, mixed Seed Quilt options like the Super Salad Mix & Zesty Mix allow you to have a beautiful harmony of flavors & nutrients all from one quilt! Here are the flavor profiles of the greens included in the Super Salad Mix: Broccoli– Mild, fresh, & slightly bitter Kale– Similar flavor as adult kale (or spinach), but slightly milder & sweeter with a slightly nutty aftertaste Kohlrabi – Mild, sweet Cabbage- Mild, earthy & refreshing Cauliflower – Sweet, Mildly Peppery and Broccoli-like taste ___________________________________________________________________________________________ Day 1 - Let's Get Growing! For setup, just follow the regular simple Hamama instructions like you always do! Here is an electronic version of our instructions if you need a quick refresher :D The initial soak is always the most important step in the process as it provides the seeds in your Seed Quilt with the water to jump-start the germination process. To ensure that it is adequately soaked, be sure to hold it down long enough for the Seed Quilt to turn a shade darker. A good trick is to flick the seed quilt! If the seeds roll around in their pods, that is a good sign it is too dry and could soak for just a little longer. After the soak, you want to be sure that the Seed Quilt is properly propped on the tray's bottom ribs so that neither side of the quilt is dipping into the water. You also want to be sure the seed pockets are not underwater after the dunk! Here are some extra watering tips! Day 2 - Sleeping Beauties You won’t see too much happening on day two but I do want to share some important things to note: -The water level may have gone down significantly from day one. That’s totally normal! Our Seed Quilts and trays are designed to provide the seeds with enough water to last them from day one until harvest day. No need to add additional water at this point! -Another thing to note is the environment where you keep your greens! When referring to temperature, anywhere between 60-80 F is best. The warmer they are in that range, the faster they will grow on time with predictable health. Cooler temps can stunt the growth and it'll take a little longer for the seeds to germinate. Microgreens don't necessarily need a lot of light to grow but will halt if they are too cold so I would prioritize warmth over light! Remember our rule of thumb: if it’s comfy for you, it’ll be comfortable for your little seedlings! Curious what that top layer is for? It's important to have a weighted black-out period for the first few days of growing microgreens. The weighted black-out period is crucial for two reasons - holding the seeds in place and shielding them from light. Holding the seeds down helps keep the seeds in close contact with the moist coconut mat & encourages the seeds to send their roots downward, deeper into the coconut mat. The darkness is important for the first few days so the seeds can germinate, root deeply, and grow to a point where they're ready to start photosynthesis. Pictured: Day 8 Zesty Mix (top left), Day 10 Wheatgrass (top right), Day 2 Super Salad Mix (Bottom left), Day 7 Broccoli (Bottom right). Day 3 - On a Roll! On day 3 you should start to see your Seed Quilt starting to puff or balloon up (or even break through the paper a bit)! This means your seeds are starting to germinate and produce small roots! :D Day 4 - Superstars You can see that the paper has ballooned up even more and that the germinated seeds are growing beautifully. Some are even breaking through the top paper! The peel time for this Seed Quilt is 5-6 days, so I am going to let these cook a day or two more before I pull the top parchment paper back. I spy some over-achievers! :D Day 5: SUPER PEEL! Yay, it is time to meet your little greens! There are two ways in which your Seed Quilt can look at this point, as demonstrated in the image below. This particular Super Salad Mix Seed Quilt is a good example of a “ballooned” quilt (with just a touch of ripping) which allows you to just peel the cover off in one motion! Depending on growing conditions, some Seed Quilts will rip through the top layer rather than balloon. All you have to do in that case is remove the pieces individually. If you are curious to see what the ripping looks like in more detail, check out our refreshing cabbage growing diary! Day 6- Lettuce Celebrate! After peeling & giving these microgreens the necessary airflow and light they need to keep growing strong, they have sprung up and greened up quickly! 💪 These greens were all peeled on the same day! The picture was taken 1 day after peeling the top paper back. Pictured from left to right: Spicy Daikon Radish, Sweet Wheatgrass, & Super Salad Mix. A fun reminder that these greens have slightly varying growth rates and mature heights :D Day 7- I Beleaf in you! These Super Salad microgreens are now measuring at about 2 inches. Day 8- You Grow Girl! Some folks get concerned about the slightly uneven growth in our Zesty & Super Salad Seed Quilts - This micro mix has slightly varying heights & colors due to the different seed varieties! Totally normal & healthy :D Day 9- Harvest on the Horizon! These are almost 3.5 inches now in my case, and quite dense! For me, the Super Salad mix tends to reach about 3-4 inches at maturity. Super Salad, Day 9 (Center) Day 10- Hello Harvest Day! For me, these look perfectly mature on day 10. They have a rich green color (with pops of purple from the red cabbage), soft lush leaves, and are just over 3.5 inches tall (reminder that they have varying heights). Use this mature height as a general rule of thumb! Storing your Super Salad Micros: These can be harvested at around 3-4 inches. They can be harvested by cutting or even pulling up, & stored in a ziplock bag (or the Stasher bag) in the fridge for abut 10 days like that. If you prefer to munch on them while they are in the tray, the mature greens can remain there for a few extra days, but please periodically check that they have enough water to drink! Otherwise, they will wilt over from thirst! 😢 Should you rinse your harvested microgreens before use? When the microgreens are ready to harvest you don't need to wash them, but you can if you want. Whatever you feel comfortable with! Since there’s no soil, they’re already super clean. Most folks who do rinse do so if they have pets who might be snooping around in them :D The most important thing you should do for cleanliness is to treat them just like any other food item and always wash your hands when handling! *For longer storage, don’t rinse the harvested microgreens before storing. Instead, put them in your ziplock bag in the fridge & rinse just before eating, if desired! Some ask if the mature microgreens should be rinsed before use! When the microgreens are ready to harvest you don't need to wash them, but you can if you want. Whatever you feel comfortable with! Since there’s no soil, they’re already super clean. The most important thing you should do for cleanliness is to treat them just like any other food item and always wash your hands when handling! *For longer storage, don’t rinse the harvested microgreens before storing. Instead, put them in your ziplock bag in the fridge & rinse just before eating, if desired! How to Eat your Super Salad Micros: These Super Salad Microgreens are great for garnishing any meals like pizza, soups or pasta, or for tossing in salads, wraps, & sandwiches for a fun mix of colors & flavors. You get mild, earthy, savory & sweet notes all in 1 bite!! They are great on their own for snacking too :D Standout Super Salad Micro Recipe 1 - Vibrant Mediterranean Salad Standout Super Salad Micro Recipe 1 - Super Salad Cashew Mac Standout Super Salad Micro Recipe 3 - Super Salad Carnitas Bowl Check out other Hamama Super Salad recipes & blog posts here! Don't forget to check out Super Salad-related posts on our Hamama Friends Facebook Page! We just love our community of growers & eaters! Thanks for popping by! Happy growing!